TwinCAT3 (Windows)
Table of Contents
You're reading the documentation for a development version.
1. Introduction
TwinCAT 3 (The Windows Control and Automation Technology) is a development platform from Beckhoff that transforms any compatible PC into a real-time control system for managing various types of industrial automation systems, such as PLC (Programmable Logic Controller), motion control, robotics, and more.
Install TwinCAT3
This installation process can refer to the installation guide provideed on Beckhoff official website.
Tip: If you need to develop using C++, please note the following:
- The installation order should be: first install Visual Studio; and then install TwinCAT3. :::
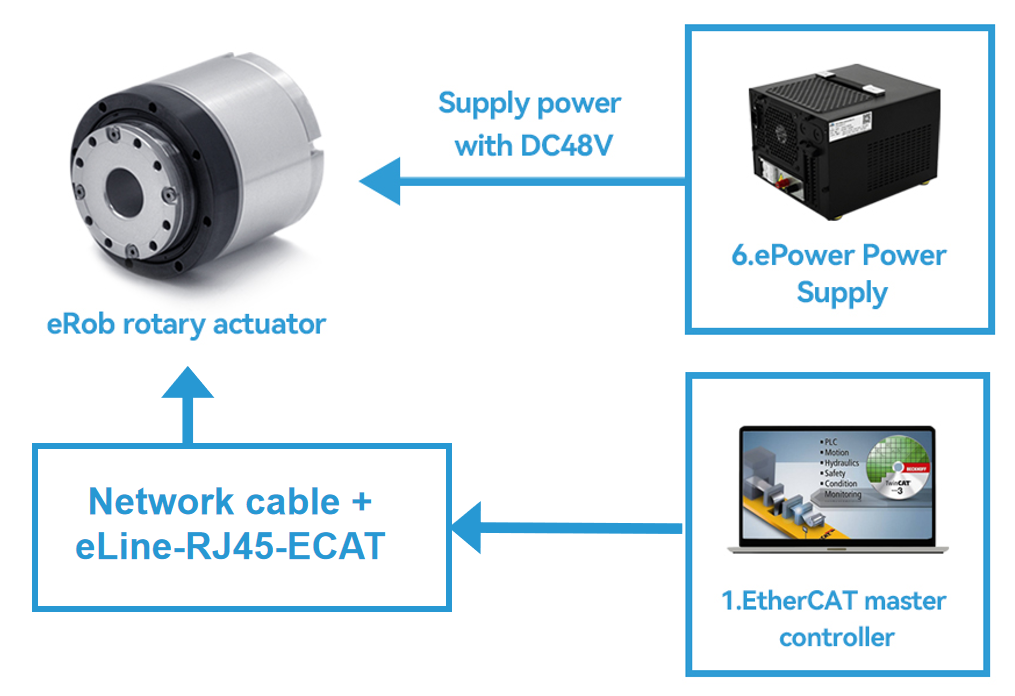
2. Connecting Computer to eRob
The connection method can refer to the video ——>>>Link.
3. Create TwinCAT Project
3.1 ESI File Placement
The name of the XML (ESI) configuration file for eRob is:
ZeroErr Driver3.2.0.xml ——>>>Download link
The XML (ESI) file path for Beckhoff TwinCAT3 is as follows:
C:\TwinCAT\3.1\Config\Io\EtherCAT
3.2 Creating a New Project in TwinCAT
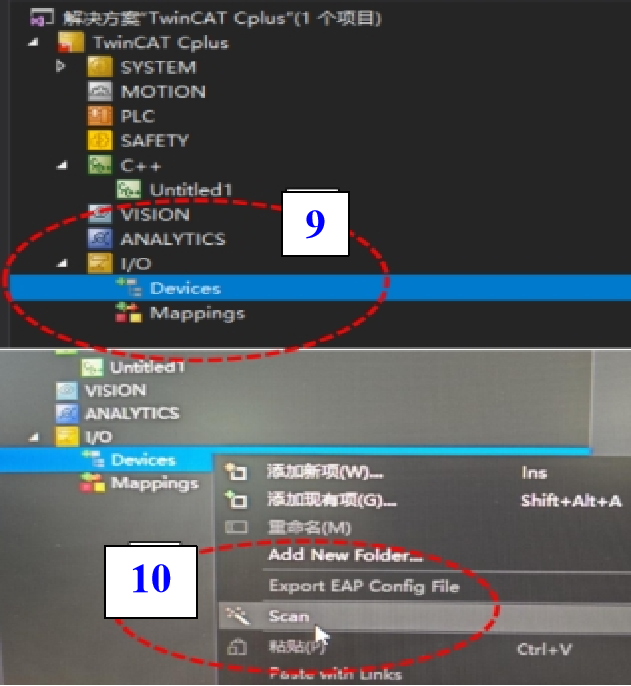
After creating a new TwinCAT project, the first step is to ensure that the IP address connection is correct. The second step is to right-click on "Devices", select the "Scan" option, and automatically scan for devices.
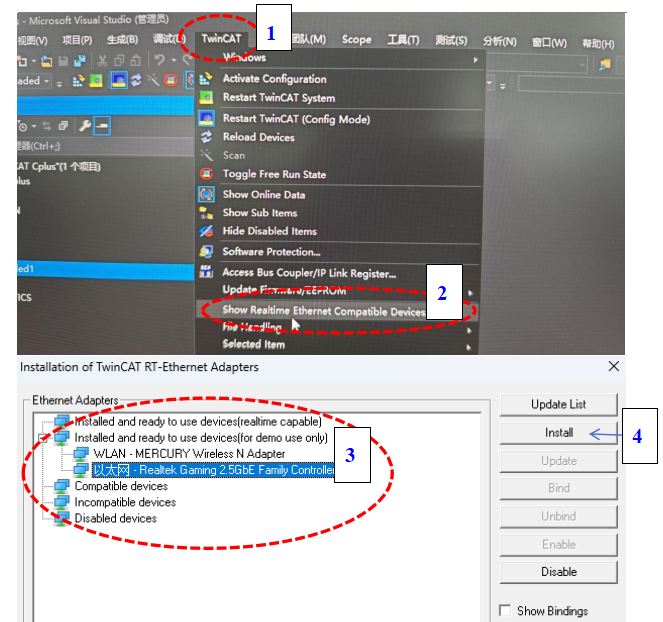
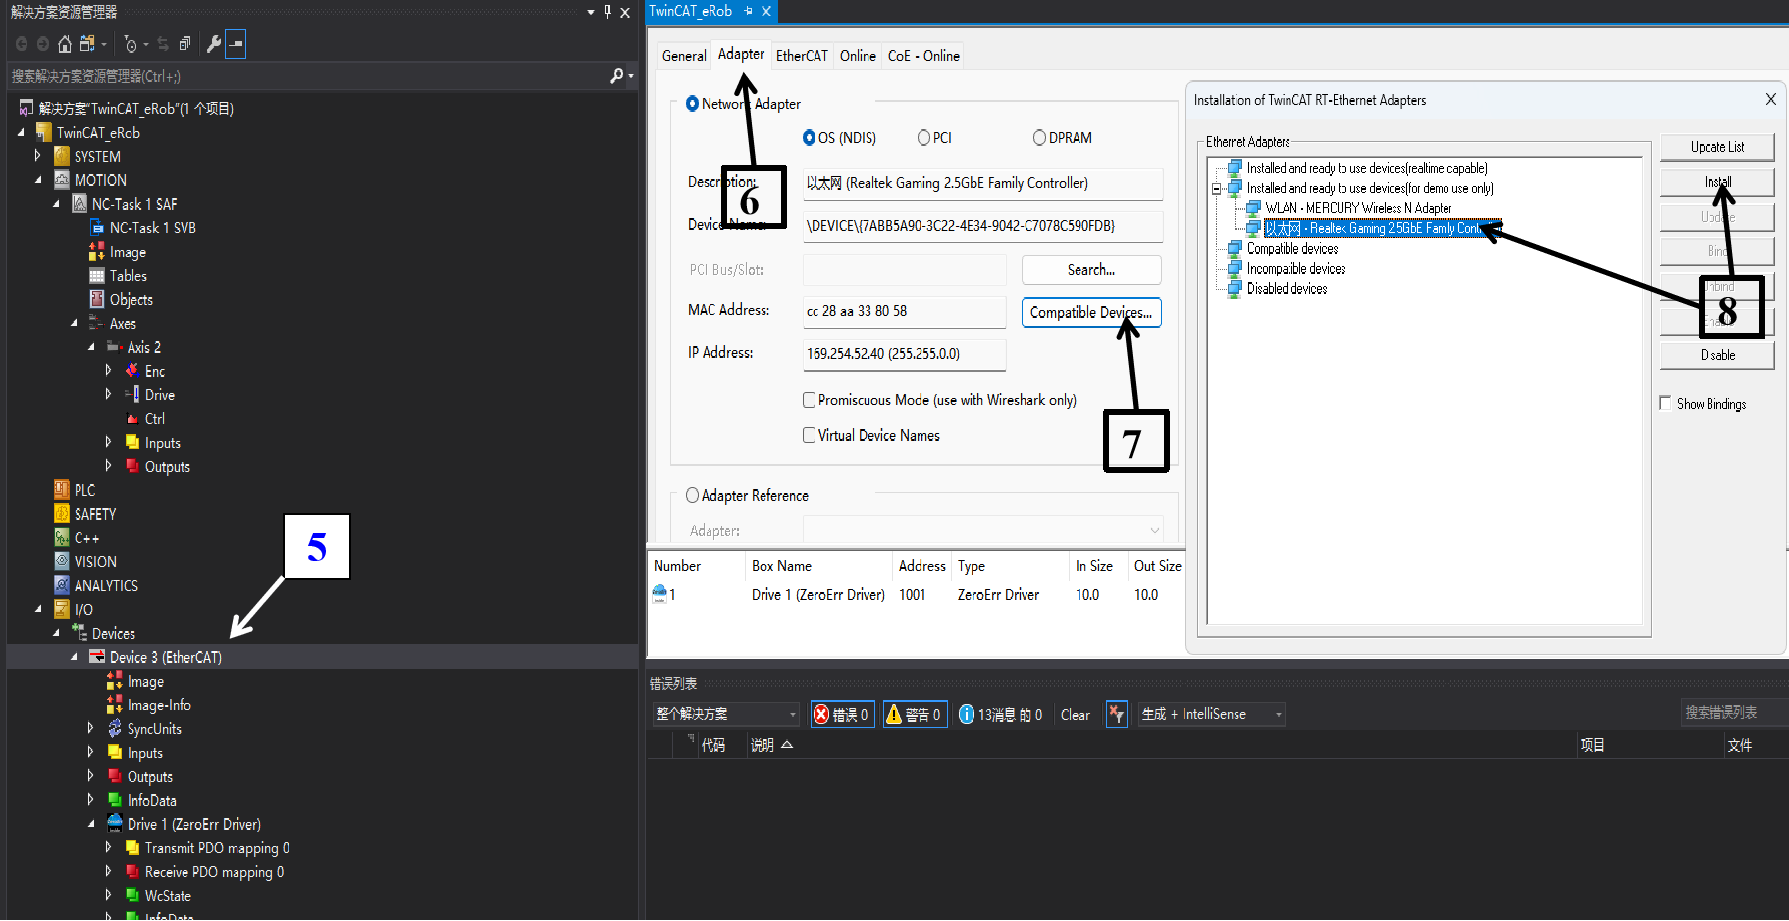
If the system cannot recognize the Driver1(ZeroErr Driver), you need to install and select a compatible device using the following method:
After automatically scanning for devices, to ensure that the axis can move properly, you need to configure the axis parameters. The configuration process can be referenced in Chapter 6 of eRob CANopen and EtherCAT User Manual v1.9.
Download link for the manual
3.3 Parameter Configuration
It is necessary to configure the parameters of each axis to ensure the correct movement.
-
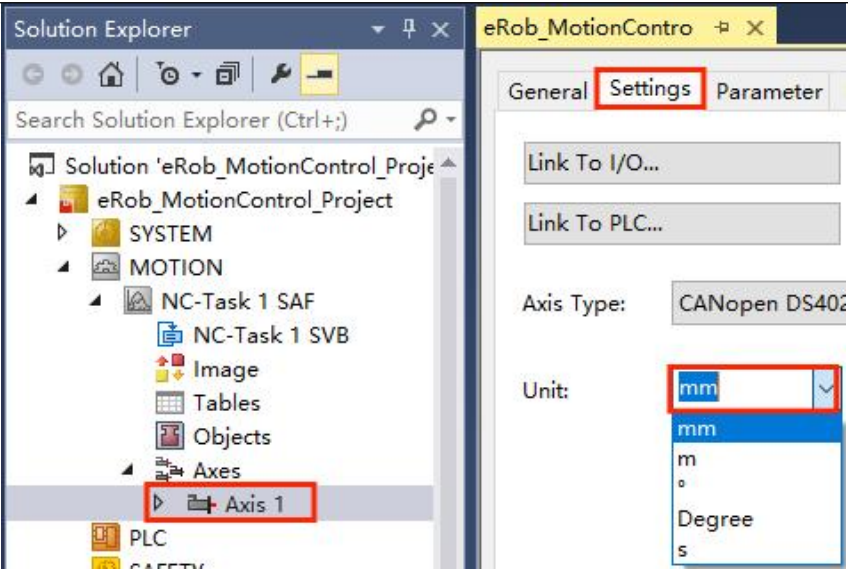
- Unit configuration: In the navigation directory on the left go to the TwinCAT project > NC-Task 1-SAF > Axes > Axis 1 .
a. Click the settings tab on the right.
b. the desired unit of the axis.
- Unit configuration: In the navigation directory on the left go to the TwinCAT project > NC-Task 1-SAF > Axes > Axis 1 .
-
- Enc Parameter configuration
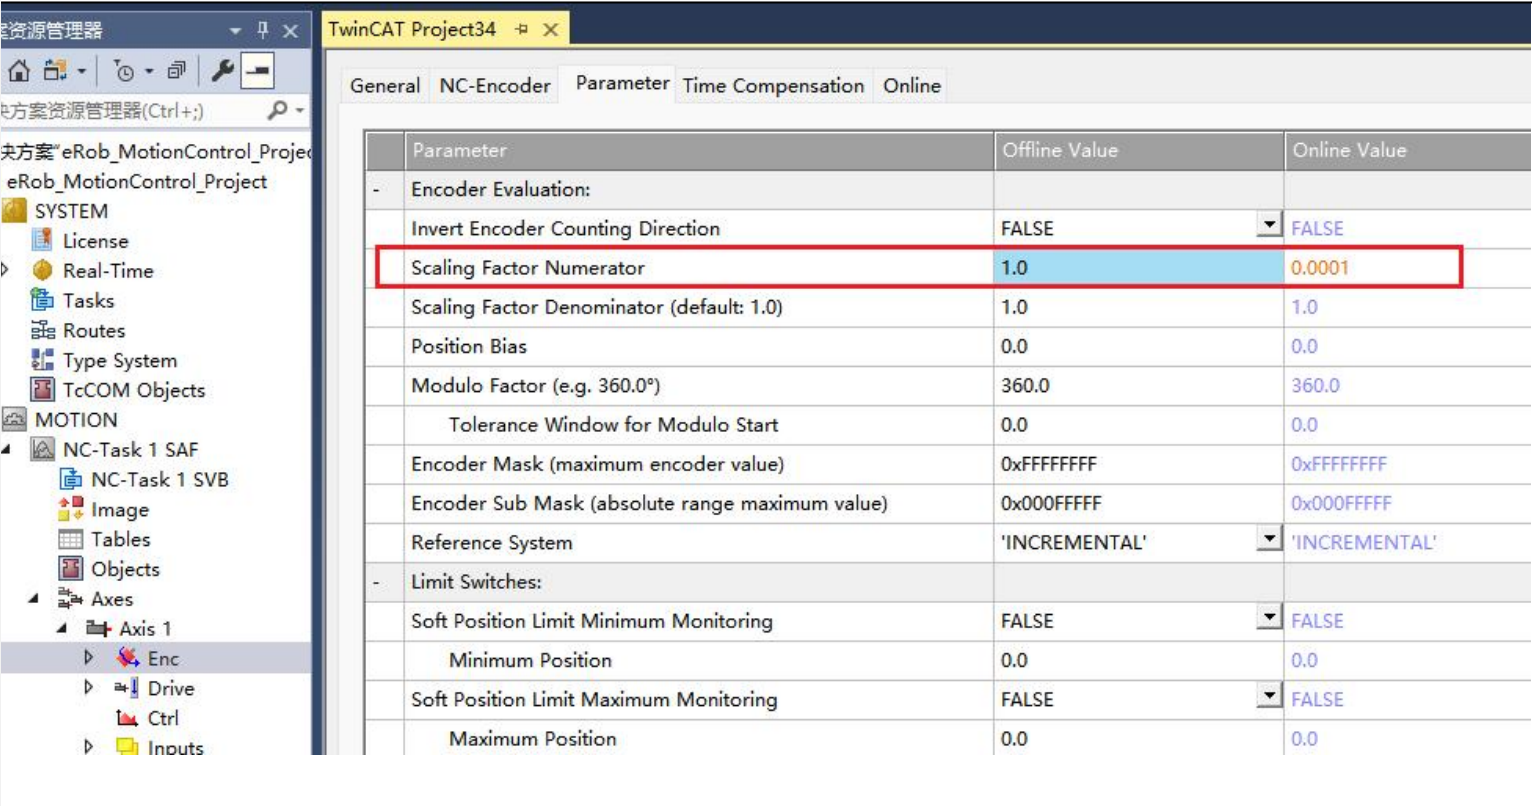
In the navigation directory on the left go to the TwinCAT project > NC-Task 1-SAF>Axes > Axis 1 > Enc.
a. Click the Parameter tab on the right.
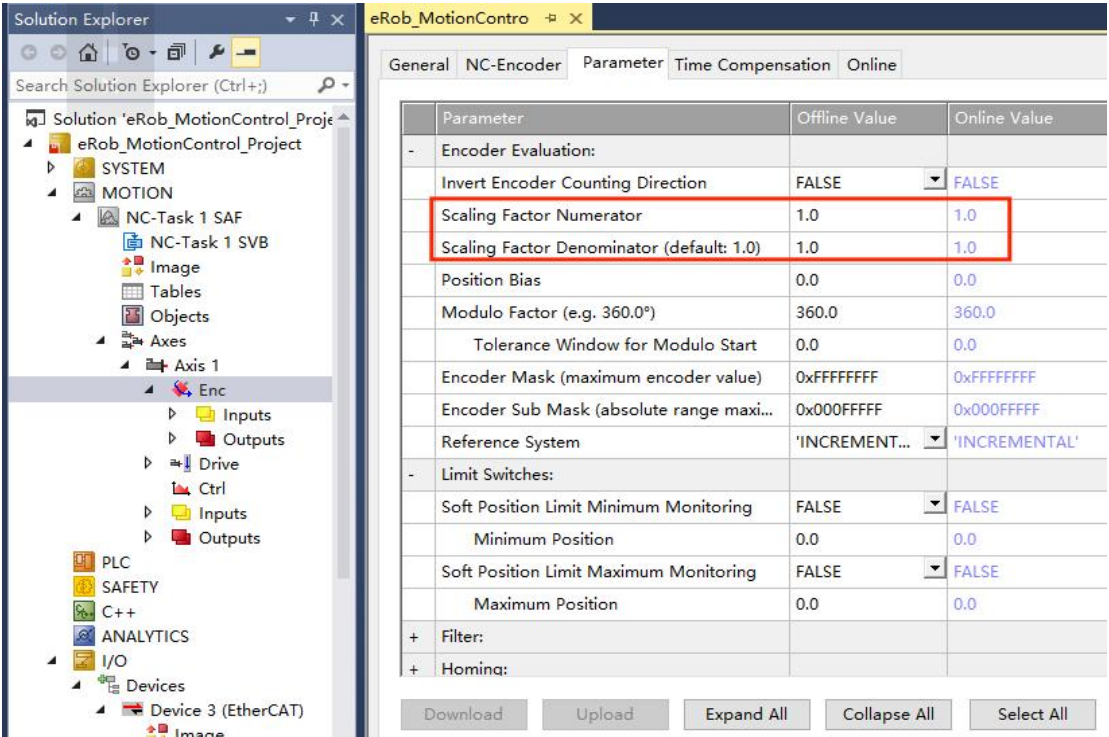
b. Click the “Encoder Evaluation” arrow to view the options. The Scale Factor Numerator and Denominator values can be changed under the Offline Value.Set both Scaling Factor Numerator and Scaling Factor Denominator to 1, that is, when the master is under NCaxis control, it sends 1 unit, and the slave servo moves 1 encoder pulse position (plus).
- Enc Parameter configuration
In the navigation directory on the left go to the TwinCAT project > NC-Task 1-SAF>Axes > Axis 1 > Enc.
-
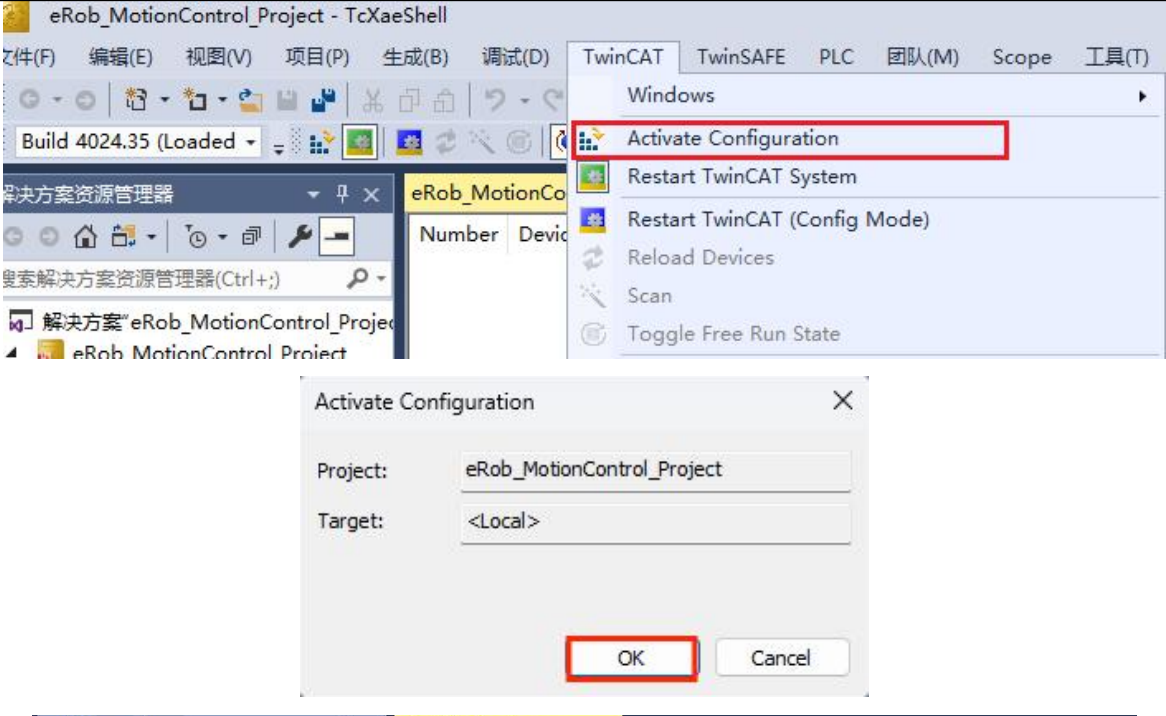
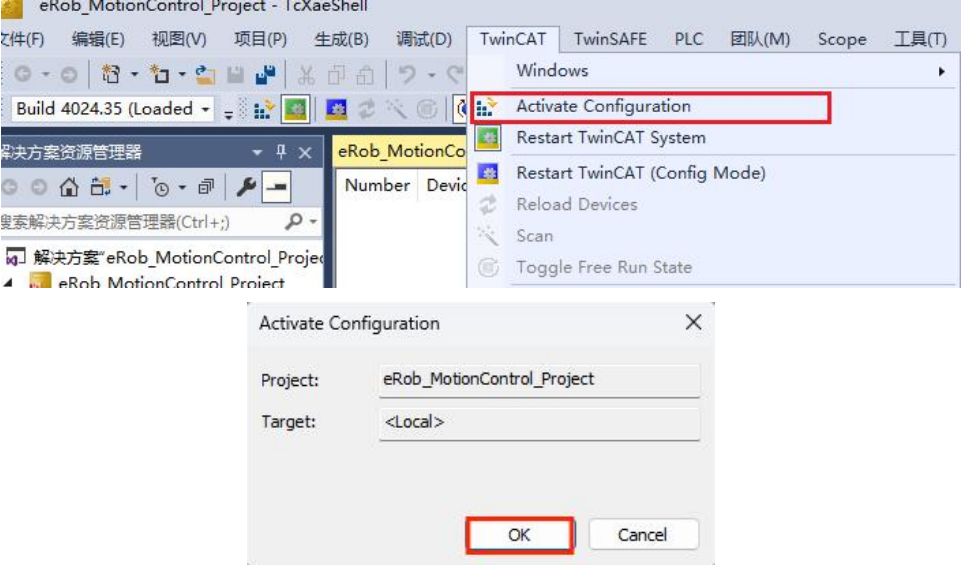
- The parameters are activated Click on the menu bar TwinCAT->Activate Configuration, and a prompt box will pop up, click “OK”. Online Value displays the modified value.
-
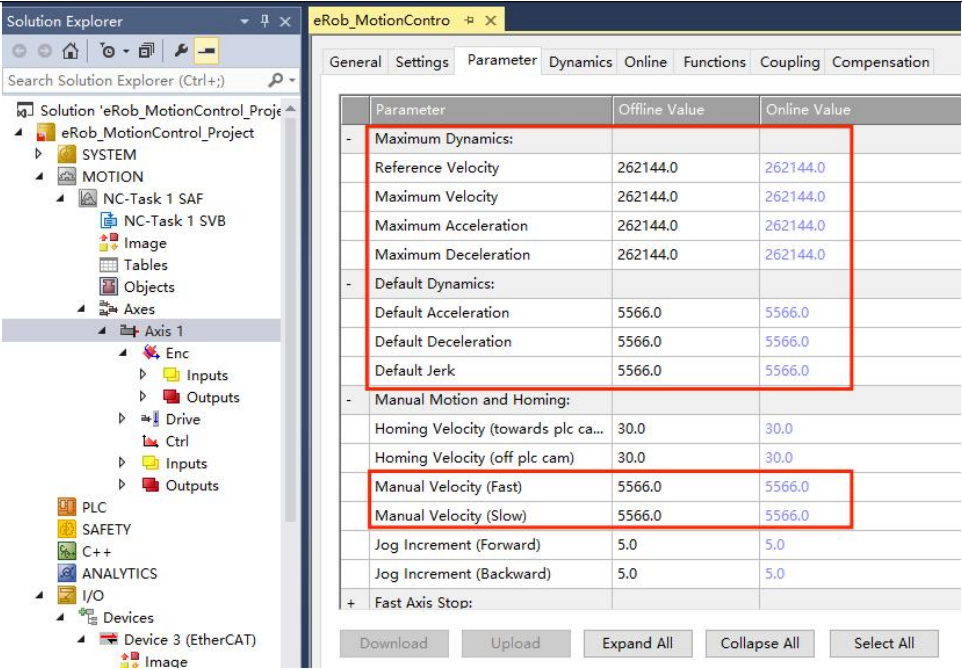
- Motion parameter configuration
In the navigation directory on the left go to the TwinCAT project > NC-Task 1-SAF>Axes > Axis 1.
a. Click the “Parameter” tab on the right.
b. Click the,“Maximum Dynamics”,“Default Dynamics” and “Manual Motion andHoming” arrow to view the options.
c. Modify value in the “Offline value”.
-
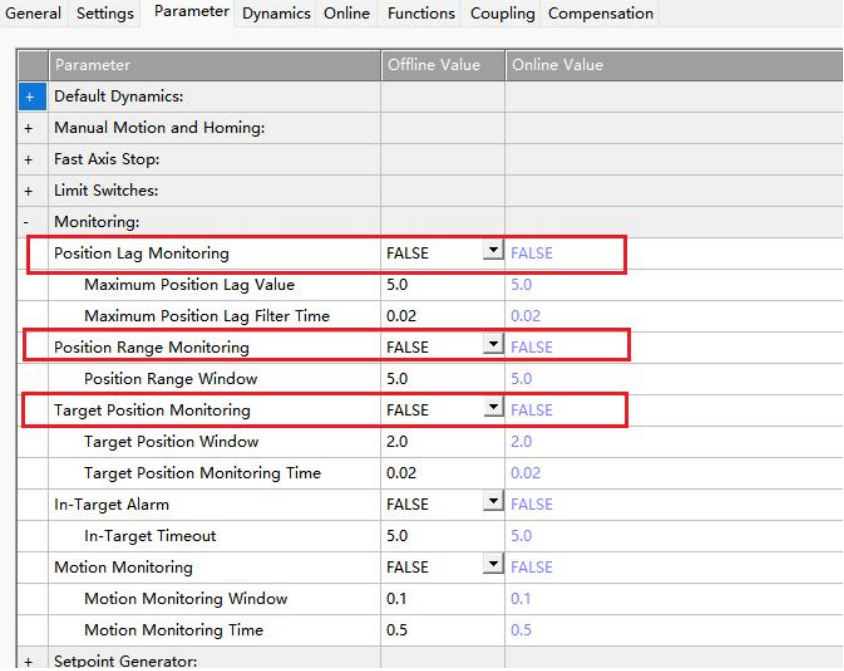
- Monitoring Parameter configuration
In the navigation directory on the left go to the TwinCAT project > NC-Task 1-SAF >Axes > Axis 1.
1)Click the Parameter tab on the right.
2)Click the Monitoring arrow to view the options.
3)In Offline value, modify the Monitoring.
- Monitoring Parameter configuration
In the navigation directory on the left go to the TwinCAT project > NC-Task 1-SAF >Axes > Axis 1.
-
- The parameters are activated Click on the menu bar TwinCAT->Activate Configuration, and a prompt box will pop up, click OK. Online Value displays the modified value.
3.4 PDO Configuration
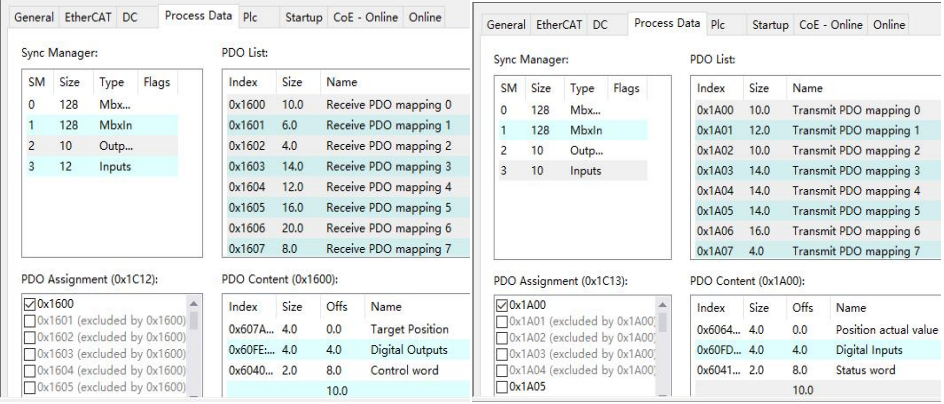
The specific operation steps of dynamic configuration of PDOby TwinCAT3master based on Beckhoff in this section are as follows.
-
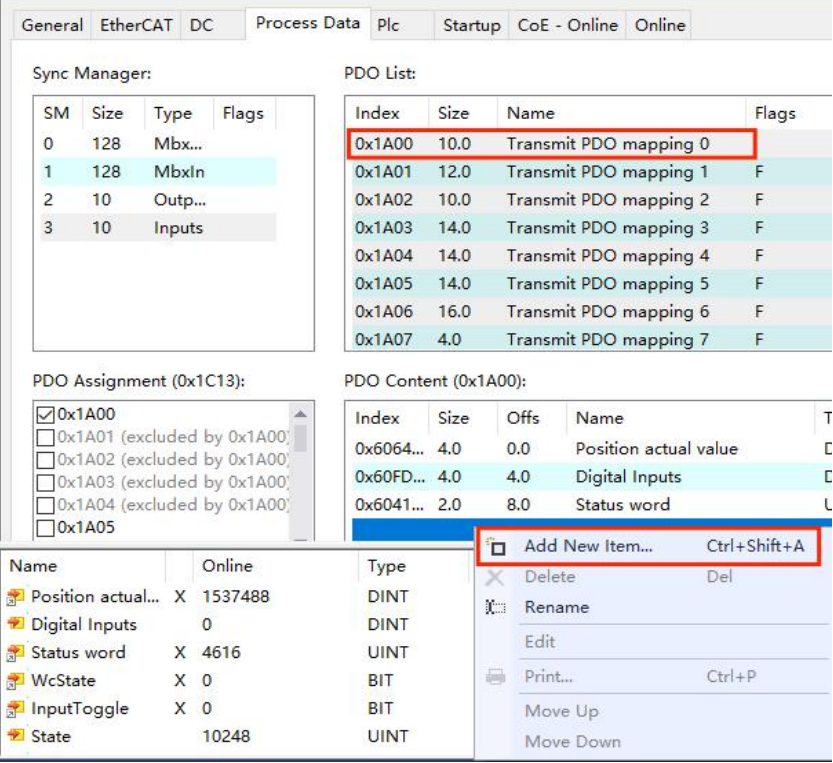
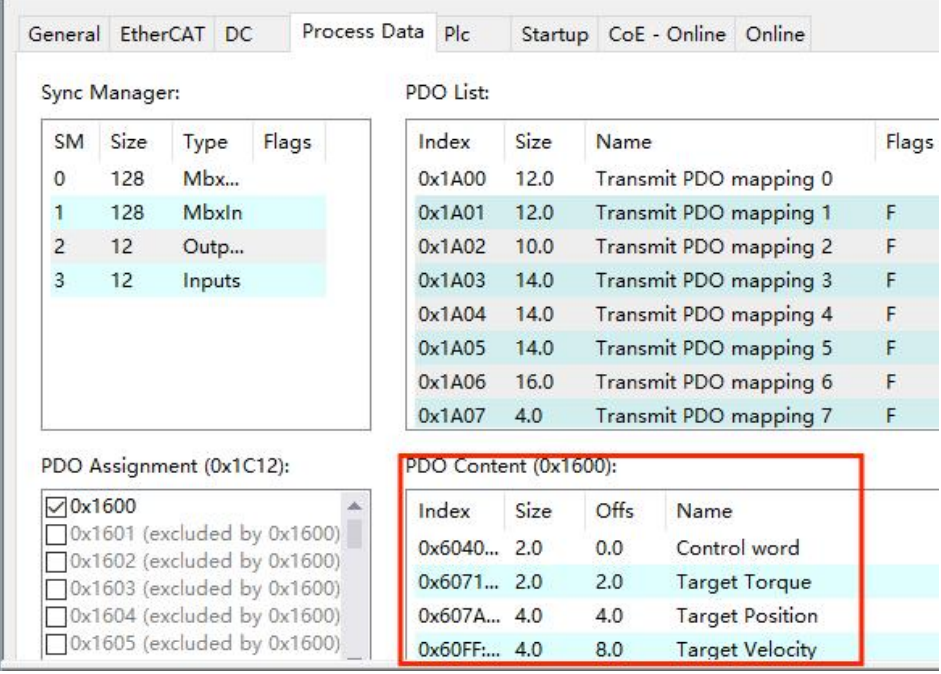
- The cyclic data is visible in the PDO-assignment window for the Inputs and Outputs of the Sync Managers. The default PDO settings use the dynamic PDOs:“0x1600- RxPDOmapping parameter, 0x1A00-TxPDO mapping parameter.”
-
- TxPDO configuration: The TxPDO maps can be changed by selecting the desired TxPDO(0x1A00) and right clicking in the PDO content window. Existing entries can be changed or deleted, and new entries can be inserted between existing or appended to the end.
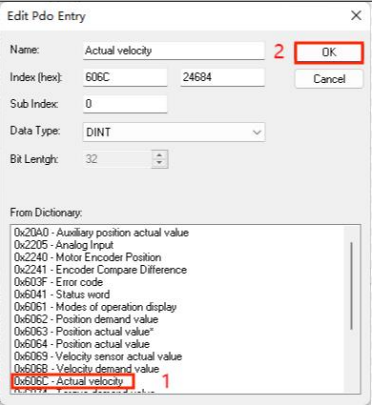
- 3.A list of mappable objects is shown. The list only shows objects that can be mapped in the direction of the map being changed. For example, attempting to insert an object on the input PDO 0x1A00 only shows objects that can be mapped in the direction from the slave drive to the master controller.
-
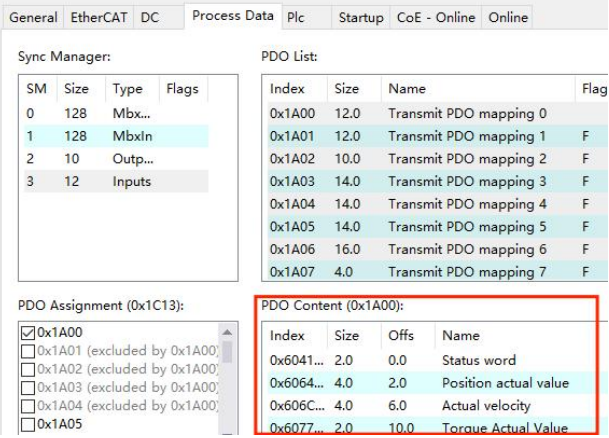
- The inserted object appears in the PDO Content (0x1A00).
-
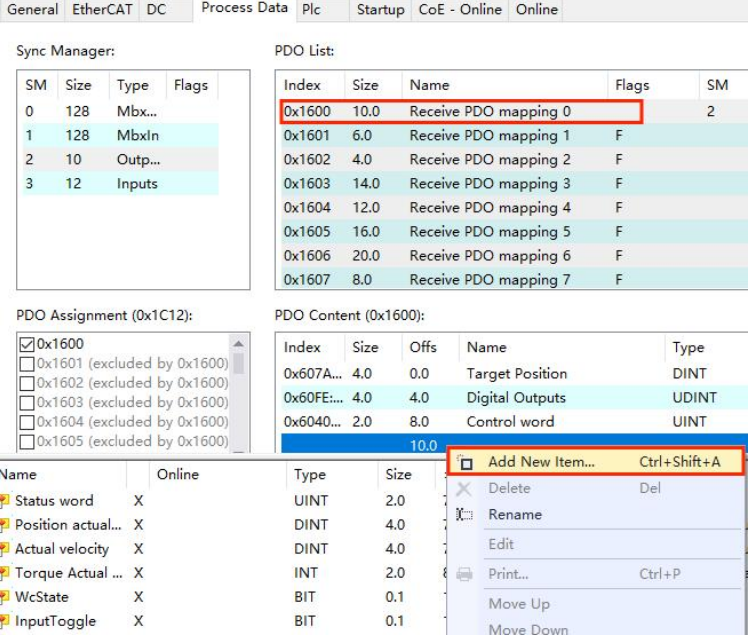
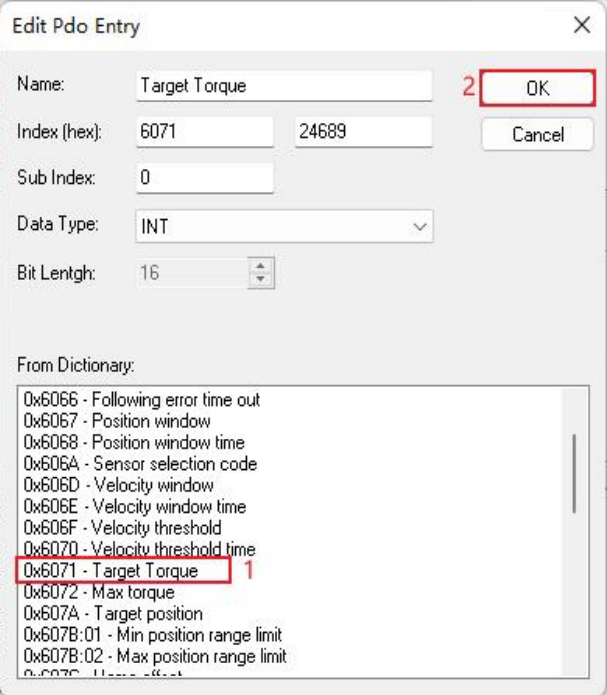
- The RxPDO maps can be changed by selecting the desired RxPDO(0x1600) and right clicking in the PDO content window. Existing entries can be changed or deleted, and new entries can be inserted between existing or appended to the end.
-
- A list of mappable objects is shown. The list only shows objects that can be mapped in the direction of the map being changed. For example, attempting to insert an object on the output PDO 0x1600 only shows objects that can be mapped in the direction from the controller to the drive.
-
- The inserted object appears in the RxPDO Content (0x1600).
As the PDO map is changed, the startup script is automatically updated by TwinCATtosend to the slave drive during the PREOP to OP transition.The automatic link of the DSP402 standard entries is only executed for axes which use standard object. With other modes of operation it is necessary to link the PDO’s manually.
3.5 Motion Control
-
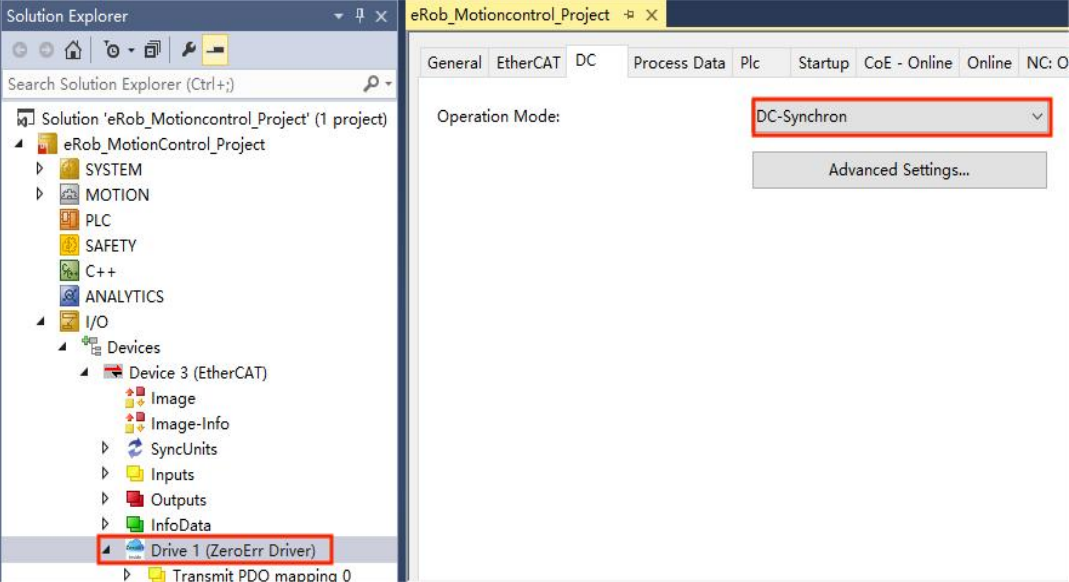
- The operation mode of EtherCAT interface has to be selected between “SM-synchron” or “DC-synchron”. In this example “DC-synchron” is selected.
-
- Activate the configuration by clicking
Activate configuration
- Activate the configuration by clicking
-
- Click
YES.
- Click
-
- Double click on the
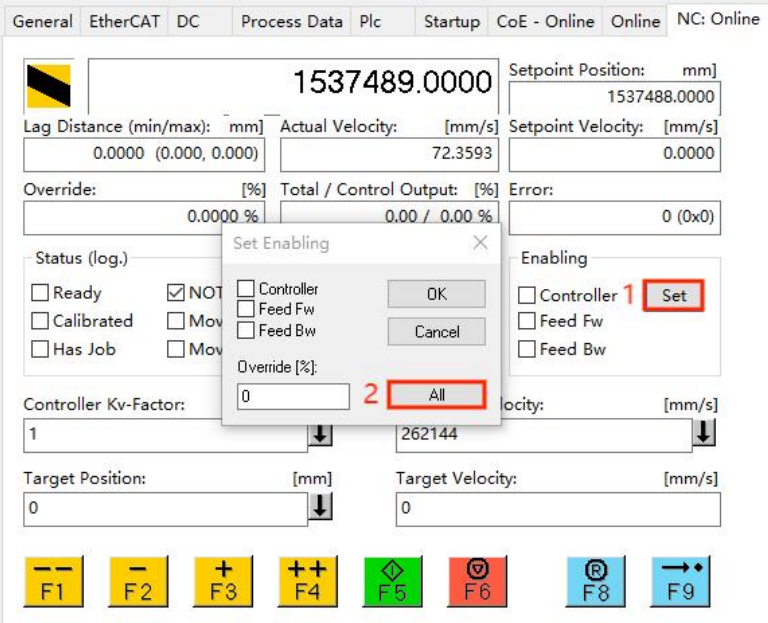
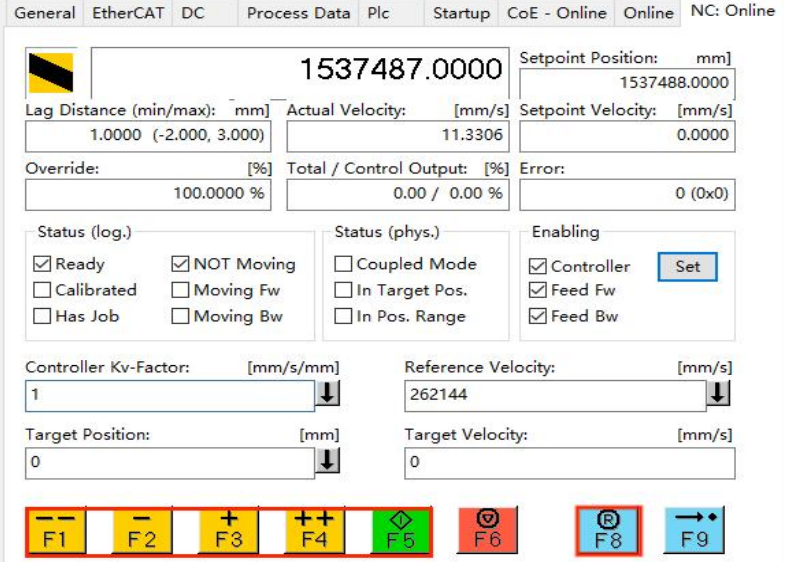
Driver1(ZeroErr Driver). Navigate to “NC-Online” and click on “Set” in the Enabling menu. -> Click onAllto set the enables
- Double click on the
-
- Now input a target position and a target velocity and move the axis with the “F5”button tothe target position.click “F1, F2, F3, F4” to manually control the motor to run forward or reverse at a fast or slow velocity. Click “F8”
4. PLC Programming
To control eRob using PLC programming, it is necessary to understand the relationship between the NC axis, PLC axis, and physical axis in TwinCAT. Additionally, the mapping relationship between the object dictionary and the NC axis can be configured according to the documentation provided on the Beckhoff official website.
Relationship diagram for reference only:
Here, a deep understanding of TwinCAT usage is required. If needed, additional configuration instructions will be provided later to ensure that eRob can be driven by connecting the NC axis via the PLC axis using the built-in functions in TwinCAT. A pre-configured program is provided here as a reference.
